
Shop Our Best Sellers Today
UP TO 60% OFF ON CLEARANCE
FREE SHIPPING ON ORDERS OVER $299*


Fabric Clean regularly with a vacuum cleaner. Do not use any solvent containing a cleaning agent. Remove spilled liquids immediately in the direction of seam to seam. Use distilled/purified water to avoid chalk stains. Glass Clean with a glass cleaner. Never use abrasive detergents. Use table mats on the surface to avoid scratches from forming. Metal For regular cleaning, use a slightly wet cloth and immediately dry. You may periodically use special cleaning agents, especially for chrome or copper materials. Polished Marble and Stone Quarried stone or marble contains natural fissures along with color variations. These are not considered defects as they enhance the look and the uniqueness of the item. As hard as stone or marble is, the surface is still porous and might stain from liquids or foods. Glass cleaner or soap and water may be used to maintain the stone or marble surfaces. As a recommendation, we suggest polishing these materials with clean wax. For best results use a polisher product which contains carnauba wax. This type of wax is readily available from your local home improvement store. Waxing often will help protect the surface from stains caused by water or liquids. Please note that applying wax prior to use with foods or liquids is highly recommended. Synthetic Leather Dust off regularly and use a slightly wet sponge periodically. Use light soapy water to remove stains. Persistent stains can be removed by carefully using cleaning solvents. Always clean in the direction of seam to seam. Solid Wood As wood is a hygroscopic natural product, it may shift in various temperature or humidity, depending on the type of wood, construction, and place of location. Optimum conditions are 64-700F (18-210C), with the humidity of 45- 55%. Untreated and Lacquered Wood Dust off regularly. Use slightly wet cloth once in a while. Clean in the direction of the wood texture. Avoid stagnant moisture. Oiled, Bleached, and Waxed Wood Dust off regularly with a damp cloth. Protect and clean with paraffin oil-based products. Wood Laminated or Coated with Melamine Resin Use anti-static dusters for daily care. Use lukewarm suds to remove light staining. Do not use abrasive detergents, any wax, or furniture polish. Melamine resin can be cleaned best with cleaning solvents in combination with a chamois leather.
Fabric Clean regularly with a vacuum cleaner. Do not use any solvent containing a cleaning agent. Remove spilled liquids immediately in the direction of seam to seam. Use distilled/purified water to avoid chalk stains. Glass Clean with a glass cleaner. Never use abrasive detergents. Use table mats on the surface to avoid scratches from forming. Metal For regular cleaning, use a slightly wet cloth and immediately dry. You may periodically use special cleaning agents, especially for chrome or copper materials. Polished Marble and Stone Quarried stone or marble contains natural fissures along with color variations. These are not considered defects as they enhance the look and the uniqueness of the item. As hard as stone or marble is, the surface is still porous and might stain from liquids or foods. Glass cleaner or soap and water may be used to maintain the stone or marble surfaces. As a recommendation, we suggest polishing these materials with clean wax. For best results use a polisher product which contains carnauba wax. This type of wax is readily available from your local home improvement store. Waxing often will help protect the surface from stains caused by water or liquids. Please note that applying wax prior to use with foods or liquids is highly recommended. Synthetic Leather Dust off regularly and use a slightly wet sponge periodically. Use light soapy water to remove stains. Persistent stains can be removed by carefully using cleaning solvents. Always clean in the direction of seam to seam. Solid Wood As wood is a hygroscopic natural product, it may shift in various temperature or humidity, depending on the type of wood, construction, and place of location. Optimum conditions are 64-700F (18-210C), with the humidity of 45- 55%. Untreated and Lacquered Wood Dust off regularly. Use slightly wet cloth once in a while. Clean in the direction of the wood texture. Avoid stagnant moisture. Oiled, Bleached, and Waxed Wood Dust off regularly with a damp cloth. Protect and clean with paraffin oil-based products. Wood Laminated or Coated with Melamine Resin Use anti-static dusters for daily care. Use lukewarm suds to remove light staining. Do not use abrasive detergents, any wax, or furniture polish. Melamine resin can be cleaned best with cleaning solvents in combination with a chamois leather.
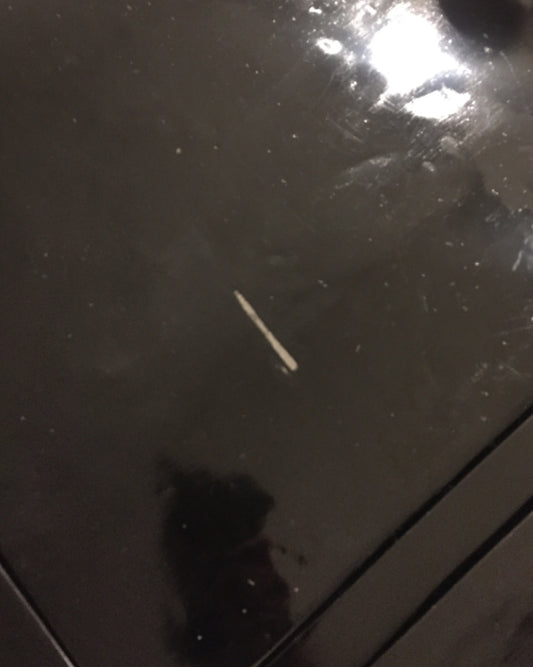
Steps Get the replacement paint kit from TOV Use a minimum 1000 grit sandpaper to even out the scratched area. Use the sandpaper or mesh on as small of an area as possible - it will irreversibly affect the surface, so we want to make the fix on as small an area as possible Apply the paint as evenly as possible. Use light layers to evenly coat the scratch. Allow the surface to dry before adding another layer of paint. Use a blow dryer to help with the drying. Buff or polish with a rag at the end
Steps Get the replacement paint kit from TOV Use a minimum 1000 grit sandpaper to even out the scratched area. Use the sandpaper or mesh on as small of an area as possible - it will irreversibly affect the surface, so we want to make the fix on as small an area as possible Apply the paint as evenly as possible. Use light layers to evenly coat the scratch. Allow the surface to dry before adding another layer of paint. Use a blow dryer to help with the drying. Buff or polish with a rag at the end
Grab the vacuum cleaner and pick up any dust or grainy particles from the leather or fabric. If the cushions are removable, pull them off the sofa so you can get into all the edges and remove any little bits that have fallen down the cracks. If you take the time to vacuum your sofa like this at least once a week, it will help to prevent the fabric or leather on your sofa becoming damaged or worn over time so your furniture will look cleaner and last longer. Using the vacuum can also help the cushions bounce back to shape – as you pull the vacuum head across the cushions you’ll help to loosen and separate some of the fibres in preparation for a full plumping. Ensure you use the right vacuum head for the job, such as a brush attachment, so it’s gentle on the fabric or leather. Regular plumping This will bring air back into your seat cushions, which will ensure your sofa stays comfortable. This is more prevalent in ranges that have fibre fillings, but every type of seat filling, from foam and fibre toppers through to sprung core seats, need to be plumped at least once a week to keep them looking great. First things first, remove any throws or scatter cushions from the sofa and store them carefully on another piece of furniture to avoid them getting dirty. If your sofa has removable seat or back cushions, the best plumping method for you involves removing each cushion and individually plumping them. Take the cushion in both hands and turn and rotate it as you plump, moving the filling back towards the centre. Do this with both the seat cushions and with the back cushions if they can also be removed, and then put them back into position. Move on to any scatter cushions you may have and plump them horizontally and vertically to bring air back into the fillings, then arrange them as desired. Plumping fixed seats and backs Fixed seats and backs are a better option for people who might struggle to perform daily maintenance on their cushions. They’re specially made so the fillings can breathe and return to shape on their own after use, but they still need some maintenance now and again to keep them looking their best. We like to call the best method for plumping fixed seats the “Union Jack” method – smoothing the cushions so as to redistribute the fillings and plump it back to shape. Start with your hands in the centre of the cushion and smooth outwards in opposite directions – first left and right, then top and bottom then diagonally.This will help the fillings to separate and return to their natural shape after use. Give each cushion a firm pat on the sides to invite air back into the filling, and your sofa will look as good as new. We would recommend that you do this maintenance once a week if possible, but you can do it more often if you like, it’s entirely up to you.
Grab the vacuum cleaner and pick up any dust or grainy particles from the leather or fabric. If the cushions are removable, pull them off the sofa so you can get into all the edges and remove any little bits that have fallen down the cracks. If you take the time to vacuum your sofa like this at least once a week, it will help to prevent the fabric or leather on your sofa becoming damaged or worn over time so your furniture will look cleaner and last longer. Using the vacuum can also help the cushions bounce back to shape – as you pull the vacuum head across the cushions you’ll help to loosen and separate some of the fibres in preparation for a full plumping. Ensure you use the right vacuum head for the job, such as a brush attachment, so it’s gentle on the fabric or leather. Regular plumping This will bring air back into your seat cushions, which will ensure your sofa stays comfortable. This is more prevalent in ranges that have fibre fillings, but every type of seat filling, from foam and fibre toppers through to sprung core seats, need to be plumped at least once a week to keep them looking great. First things first, remove any throws or scatter cushions from the sofa and store them carefully on another piece of furniture to avoid them getting dirty. If your sofa has removable seat or back cushions, the best plumping method for you involves removing each cushion and individually plumping them. Take the cushion in both hands and turn and rotate it as you plump, moving the filling back towards the centre. Do this with both the seat cushions and with the back cushions if they can also be removed, and then put them back into position. Move on to any scatter cushions you may have and plump them horizontally and vertically to bring air back into the fillings, then arrange them as desired. Plumping fixed seats and backs Fixed seats and backs are a better option for people who might struggle to perform daily maintenance on their cushions. They’re specially made so the fillings can breathe and return to shape on their own after use, but they still need some maintenance now and again to keep them looking their best. We like to call the best method for plumping fixed seats the “Union Jack” method – smoothing the cushions so as to redistribute the fillings and plump it back to shape. Start with your hands in the centre of the cushion and smooth outwards in opposite directions – first left and right, then top and bottom then diagonally.This will help the fillings to separate and return to their natural shape after use. Give each cushion a firm pat on the sides to invite air back into the filling, and your sofa will look as good as new. We would recommend that you do this maintenance once a week if possible, but you can do it more often if you like, it’s entirely up to you.

The Easy KD Roll-Out Slat System at TOV is a combination of 3 factors: stackable slats attached to each out by nylon strapping pegs installed on the bed frame that hold the slats in place by friction-fit the weight of the mattress itself, which holds the slats down behind their respective pegs The weight of a standard US mattress is more than enough to hold the slats in place. However, if the customer has issues or wants more security, they can screw the slats in each 4 corners of each sets of slats into the frame. It is important that they drill a pilot hole in the slats before screwing them, otherwise they will likely split the wood
The Easy KD Roll-Out Slat System at TOV is a combination of 3 factors: stackable slats attached to each out by nylon strapping pegs installed on the bed frame that hold the slats in place by friction-fit the weight of the mattress itself, which holds the slats down behind their respective pegs The weight of a standard US mattress is more than enough to hold the slats in place. However, if the customer has issues or wants more security, they can screw the slats in each 4 corners of each sets of slats into the frame. It is important that they drill a pilot hole in the slats before screwing them, otherwise they will likely split the wood
Your browser does not support the video tag.
Your browser does not support the video tag.

Doors can be adjusted in 3 orientations with concealed hinges Turning the front screw to adjust depth. Adjusting the screw on the hinge arm to adjust the gap between the door and the cabinet. Releasing the mounting plate from the cabinet so to move the door up and down.
Doors can be adjusted in 3 orientations with concealed hinges Turning the front screw to adjust depth. Adjusting the screw on the hinge arm to adjust the gap between the door and the cabinet. Releasing the mounting plate from the cabinet so to move the door up and down.

How to take off front panel from HUMP drawer
How to take off front panel from HUMP drawer

Generally speaking, a swivel chair will normally have a FA (Fully Assembled) base for ease of assembly. Occasionally however, in order to sell the product at a better price by getting better shippig rates on smaller box sizes, we need to use a KD (Knock Down) base. This does lead to a more complicated assembly as the swivel mechanism needs to be accessed from inside the base and assembled onto the underside of the chair, requiring access to the interior of the cavity. See the video below for how this needs to happen. The key element here is that the bolt holes in the chair base are lined up with the assembly holes of the swivel mechanism you’re installing. Customers may need to swivel the mechanism itself to get access to the bolt holes. Everything else is simple after that.
Generally speaking, a swivel chair will normally have a FA (Fully Assembled) base for ease of assembly. Occasionally however, in order to sell the product at a better price by getting better shippig rates on smaller box sizes, we need to use a KD (Knock Down) base. This does lead to a more complicated assembly as the swivel mechanism needs to be accessed from inside the base and assembled onto the underside of the chair, requiring access to the interior of the cavity. See the video below for how this needs to happen. The key element here is that the bolt holes in the chair base are lined up with the assembly holes of the swivel mechanism you’re installing. Customers may need to swivel the mechanism itself to get access to the bolt holes. Everything else is simple after that.
